Follow Me On Social Media!

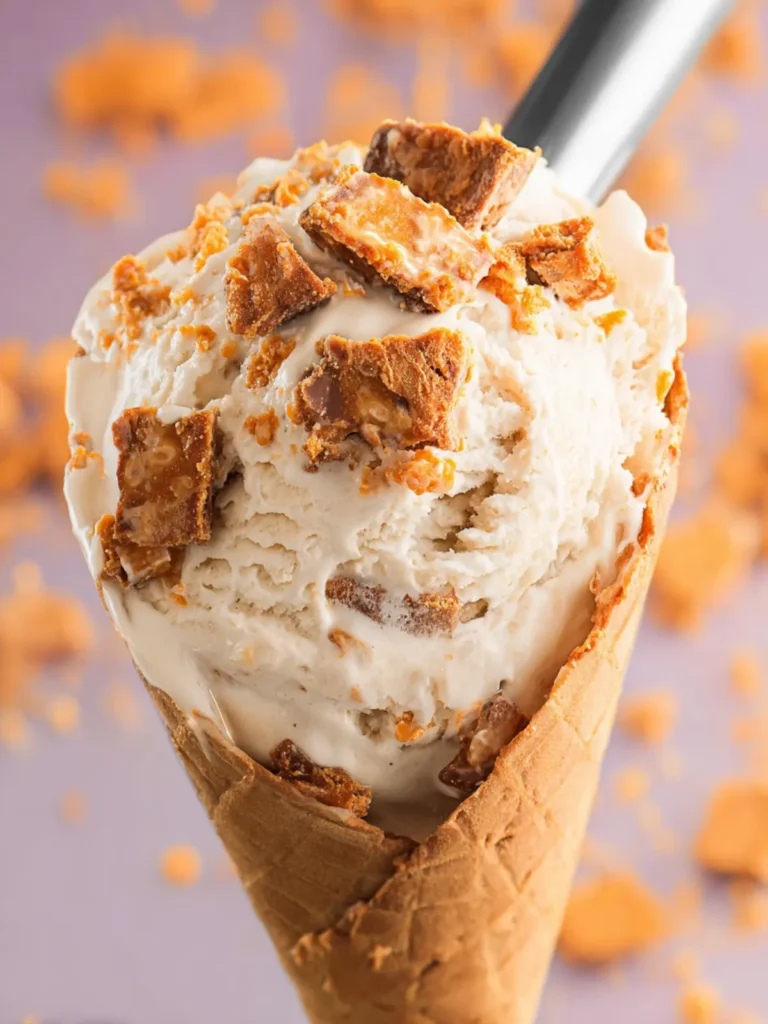
Gluten-Free Homemade Butterfinger Ice Cream: Irresistibly Creamy Delight
Introduction to Gluten-Free Homemade Butterfinger Ice Cream
Imagine this: a hot summer day, the sun shining brightly, and you’ve just finished a long week at work. What could be better than treating yourself to a creamy, decadent dessert? That’s where gluten-free homemade Butterfinger ice cream comes into play. This delightful recipe combines the smooth richness of vanilla ice cream with the crunchy, sweet, and nutty goodness of Butterfinger candy bars, all while being completely gluten-free. It’s the perfect indulgence that brings nostalgic memories rushing back with every flavorful bite.
Creating your own gluten-free homemade Butterfinger ice cream not only allows you to control the ingredients but also infuses your dish with a level of personalization and creativity that’s hard to find in store-bought options. Whether you’re celebrating a special occasion or just satisfying a sweet tooth, this ice cream will certainly leave a lasting impression.
What makes this ice cream recipe so special?
The magic of this ice cream lies in its simplicity and the unique combination of flavors. Here’s what sets it apart:
-
Fresh Ingredients: By using fresh cream and high-quality vanilla, you create a taste sensation that’s far beyond mass-produced versions. You’ll savor every scoop knowing exactly what went into it.
-
Gluten-Free Goodness: This recipe caters to those with gluten sensitivities or celiac disease without sacrificing flavor. It’s made with care, ensuring everyone can enjoy a classic treat.
-
Crunch Factor: The inclusion of crushed Butterfinger bars adds a delightful crunch that perfectly complements the creamy texture of the ice cream. Who can resist that satisfying texture?
-
Customizable: Feel free to experiment! You can mix in other toppings or flavors to create a version that’s entirely your own. Want to add a swirl of chocolate sauce or a sprinkling of sea salt? Go for it!
So, get ready to fire up your ice cream maker! With this gluten-free homemade Butterfinger ice cream, you’ll become the star of your next gathering, impressing friends and family with your delicious creation. Let’s check out the ingredients you’ll need to make this incredible treat.

Key Ingredients for Gluten-Free Homemade Butterfinger Ice Cream
Creating gluten-free homemade Butterfinger ice cream is an enjoyable process that guarantees delightful results. Let’s explore the key ingredients that make this dessert a true crowd-pleaser.
Heavy Cream: The base of any luscious ice cream is heavy cream. It gives your ice cream that rich, creamy texture that melts in your mouth. Opt for high-quality cream; it makes all the difference!
Whole Milk: A splash of whole milk enhances creaminess and balances the richness of the heavy cream. If you’re looking for a lighter option without compromising on flavor, go for organic whole milk.
Granulated Sugar: To sweeten things up, granulated sugar is essential in this recipe. It helps achieve the perfect sweetness and contributes to the delightful texture of your ice cream.
Vanilla Extract: For that warm, inviting flavor, a good splash of vanilla extract is crucial. It elevates the overall taste profile of your gluten-free homemade Butterfinger ice cream, making it irresistible.
Gluten-Free Butterfinger Candies: The star of this recipe! These candies add a crunchy, peanut buttery goodness that perfectly complements the ice cream base. If you’re feeling adventurous, you can even make your own gluten-free version!
With these thoughtful ingredients, you’re well on your way to crafting a memorable treat. Who knew making gluten-free homemade Butterfinger ice cream could be this simple and enjoyable?
Why You’ll Love This Recipe
Experience the delightful indulgence of gluten-free homemade Butterfinger ice cream, a treat that’s bound to evoke nostalgic memories of childhood. Picture yourself on a warm summer day, the sun shining down as you dip your spoon into a creamy bowl of this luscious ice cream. With every bite, you’ll enjoy the unique, crunchy bits inspired by the beloved candy bar melted into a creamy, dreamy base.
This ice cream recipe combines simple ingredients that harmonize perfectly, allowing the sweet, peanut buttery flavor to shine through. You’ll appreciate how easy it is to create a guilt-free dessert without sacrificing taste. Plus, you can customize it! Whether you’re a fan of extra crunch or prefer a smoother texture, this recipe is your canvas.
Here are a few reasons you’ll fall in love with this treat:
- Homemade Goodness: No store-bought preservatives, just fresh ingredients you can trust.
- Gluten-Free Option: Suitable for gluten-sensitive folks, everyone can enjoy this delicious dessert.
- Versatile Flavor: Use your favorite nut butter or add in other mix-ins for a personal twist.
Treat yourself to this gluten-free homemade Butterfinger ice cream, and you’ll understand why it’s the ultimate indulgence that allows you to savor the sweet moments in life!

Cooking Tips and Notes
Creating the gluten-free homemade Butterfinger ice cream is a delightful adventure that offers an engaging experience for any ice cream lover. Here are some handy tips to make the most of your culinary journey:
Choose the Right Chocolate
For the chocolate base of your ice cream, opt for high-quality dark chocolate that is certified gluten-free. This not only enhances the flavor but also ensures that your delightful treat is safe for those with gluten sensitivities.
Get Creative with Add-Ins
While the classic Butterfinger flavor shines through, don’t hesitate to mix in other ingredients like crushed nuts or a sprinkle of sea salt for added texture and flavor. Personalizing your gluten-free homemade Butterfinger ice cream can elevate the treat to suit your taste.
Chill Your Ingredients
To ensure a creamy consistency, it’s important to chill your base in the refrigerator before churning. This will help the mixture freeze evenly in your ice cream maker, resulting in the best texture.
Allow for Freezing Time
Once you’ve churned the ice cream, transfer it to an airtight container and let it firm up in the freezer for at least four hours. This extra time helps develop the flavors and provides that satisfying scoopability.
Enjoy and Share
So, gather your friends or family and enjoy your amazing creation together. Sharing is a key part of enjoying food, and what better way to bond than over a bowl of delicious gluten-free homemade Butterfinger ice cream!
Serving Suggestions
Indulging in gluten-free homemade Butterfinger ice cream is a delightful experience, but have you ever thought about how to elevate it even further? This ice cream isn’t just a dessert; it’s a canvas for creativity!
-
Scoop and Drizzle: Serve your ice cream in a chilled bowl or waffle cone, and drizzle warm chocolate or caramel sauce on top. The contrast of the cold ice cream with warm sauce creates a mouthwatering sensation.
-
Toppings Galore: Get playful with toppings! Chopped nuts, crushed gluten-free cookies, or even extra crumbled Butterfinger bars can add texture and flavor. Make your ice cream a fun sundae with whipped cream and a cherry on top.
-
Make It a Shake: Blend a scoop of your gluten-free homemade Butterfinger ice cream with milk for a decadent milkshake. Top it off with whipped cream and a sprinkle of crushed Butterfinger for that extra crunch.
-
Pair with Favorite Desserts: Whether it’s a slice of gluten-free pie or a warm brownie, your ice cream can complement many desserts beautifully. It’s a simple yet effective way to add a creamy twist to your favorites.
Experimenting with these suggestions will transform your ice cream into a dessert feast, delighting friends and family alike!

Time Breakdown
Creating your own gluten-free homemade Butterfinger ice cream is not only delightful, but it also fits easily into a busy schedule. Let’s break down the time commitment you’ll need for this indulgent treat.
Preparation Time
In just 20 minutes, you can whisk together the cream, milk, sugar, and your special mix-in ingredients to kickstart your ice cream adventure.
Chilling Time
Allowing your ice cream mixture to chill in the refrigerator for about 2 hours is essential. This ensures your ice cream achieves the perfect creamy texture when it hits the ice cream maker.
Total Time
From start to finish, expect your gluten-free homemade Butterfinger ice cream experience to take around 2 hours and 20 minutes, including prep and chill time. Once you start, you might find it hard to wait for the final scoop!
Nutritional Facts
Finding delight in gluten-free homemade Butterfinger ice cream not only satisfies your sweet tooth but also comes with clear nutritional insights. Here’s what you can expect per serving:
Calories
Indulging in this creamy dessert will set you back approximately 220 calories. This makes it a sweet treat to enjoy in moderation without feeling overly guilty.
Fat
With about 12 grams of fat, the richness mainly comes from the ingredients, delivering that luscious mouthfeel we all crave in ice cream. It’s the perfect balance between indulgence and enjoyment.
Sugars
Be prepared for some sweetness! Each serving contains around 18 grams of sugar, offering a delightful burst of flavor that pairs beautifully with its buttery crunch.
These numbers should empower you to make informed choices while treating yourself to a scoop (or two!) of this decadent gluten-free homemade Butterfinger ice cream.
FAQ about Gluten-Free Homemade Butterfinger Ice Cream
Creating gluten-free homemade Butterfinger ice cream is not just about the recipe; it’s an experience packed with sweet nostalgia. Here are some common questions that might pop up as you embark on this delicious journey.
Can I use different candy bars in this recipe?
Absolutely! While Butterfinger is a nostalgic favorite and provides a unique crunch, you can swap in other gluten-free candy bars like Snickers, Reese’s, or Milky Way for a fun twist. Just check packaging to ensure they are certified gluten-free, and chop them into bite-sized pieces before adding them to your ice cream.
How long does it take to churn the ice cream?
Churning time can vary, but typically, you should aim for about 20 to 30 minutes in your ice cream maker. Keep an eye on the texture. It should start thickening up and resemble soft serve when it’s ready to be transferred to a container for freezing. Remember that a cookie dough-like consistency is what you’re aiming for!
Is it possible to make this ice cream dairy-free?
Yes! You can easily make your gluten-free homemade Butterfinger ice cream dairy-free by substituting the cream and milk. Use full-fat coconut milk or any other plant-based milk that you prefer for a rich, creamy texture. Just ensure that your chosen candy is also dairy-free. This way, everyone can enjoy a delicious scoop!
If you have any more questions or need tips while making your ice cream, feel free to reach out! Enjoy your sweet creation.
Conclusion on Gluten-Free Homemade Butterfinger Ice Cream
Creating your own gluten-free homemade Butterfinger ice cream is a delightful journey that brings joy with every scoop. The creamy texture combined with the crunchy, buttery bits captures the essence of indulgence while being mindful of dietary preferences. As you enjoy this treat on a warm day or during a cozy gathering, you’ll appreciate the uniqueness of the ingredients and the love that went into making it. Remember, the beauty of homemade ice cream lies not just in the taste but in the memories created with it. So, gather your friends or family, and make this recipe your own!
Print
Butterfinger Ice Cream
- Total Time: 20 minutes
- Yield: 6 servings 1x
- Diet: Vegetarian
Description
A delicious and creamy Butterfinger ice cream recipe that’s perfect for any occasion.
Ingredients
Scale
- 4 Cups Sugar
- 2 Cups Water
- 4 Butterfinger Candy Bars or Favorite Candy Bar
- 2–3 Quarts Half and Half
Instructions
- On medium-high heat, bring sugar and water to a rolling boil in a saucepan; continue cooking for about 1 minute.
- Let mixture cool.
- Chop candy bars in a food processor or blender to your desired consistency.
- Pour butterfingers into sugar mixture and let soak until you are ready to make ice cream.
- Mix butterfinger mixture with 2 quarts of half and half and pour into 4 quart ice cream maker.
- Lastly, add additional half and half or 2 % milk as needed to reach the “fill” line on your ice cream maker.
- Continue making ice cream as instructed on the ice cream maker instructions.
Notes
- Ensure to let the mixture cool completely before mixing with half and half.
- Feel free to adjust the amount of candy bars based on your preference.
- Prep Time: 15 minutes
- Cook Time: 5 minutes
- Category: Dessert
- Method: Churning
- Cuisine: American
Nutrition
- Serving Size: 1 cup
- Calories: 250
- Sugar: 23g
- Sodium: 90mg
- Fat: 12g
- Saturated Fat: 7g
- Unsaturated Fat: 3g
- Trans Fat: 0g
- Carbohydrates: 35g
- Fiber: 0g
- Protein: 3g
- Cholesterol: 35mg