Follow Me On Social Media!
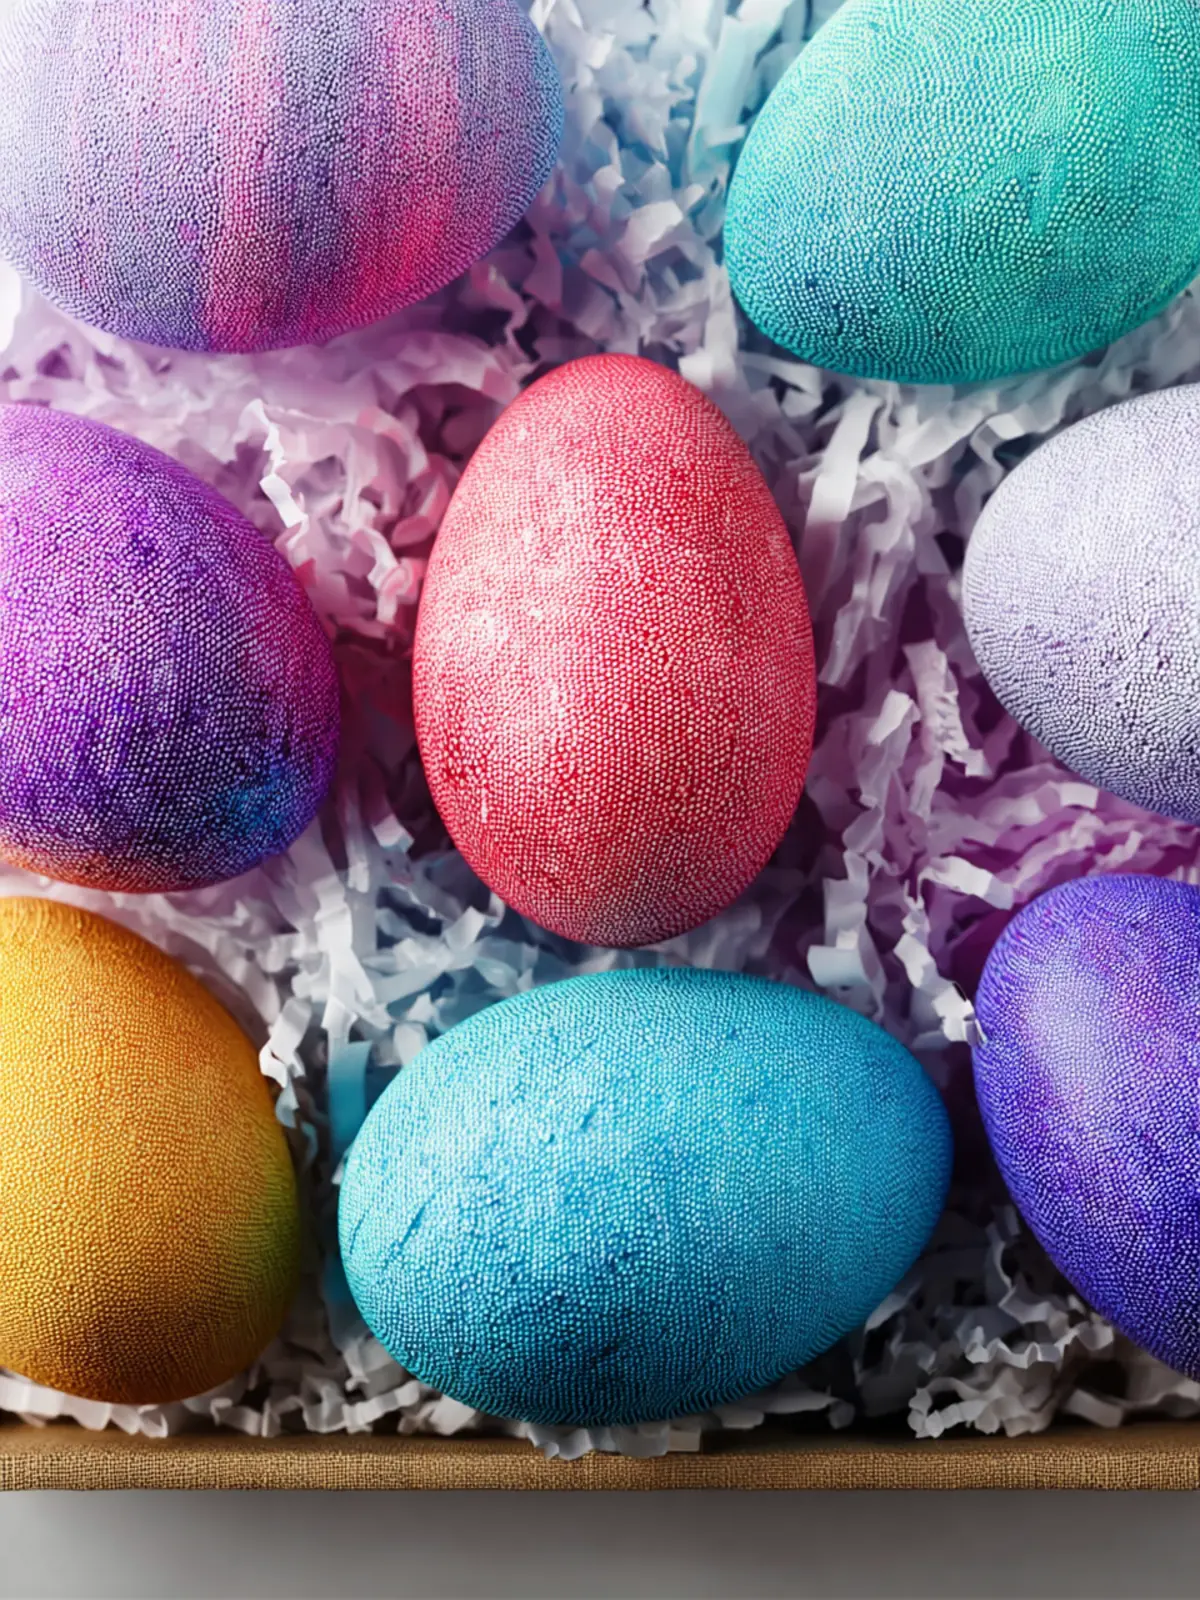
Fabric-Textured Easter Eggs: Easy DIY Fun for Everyone
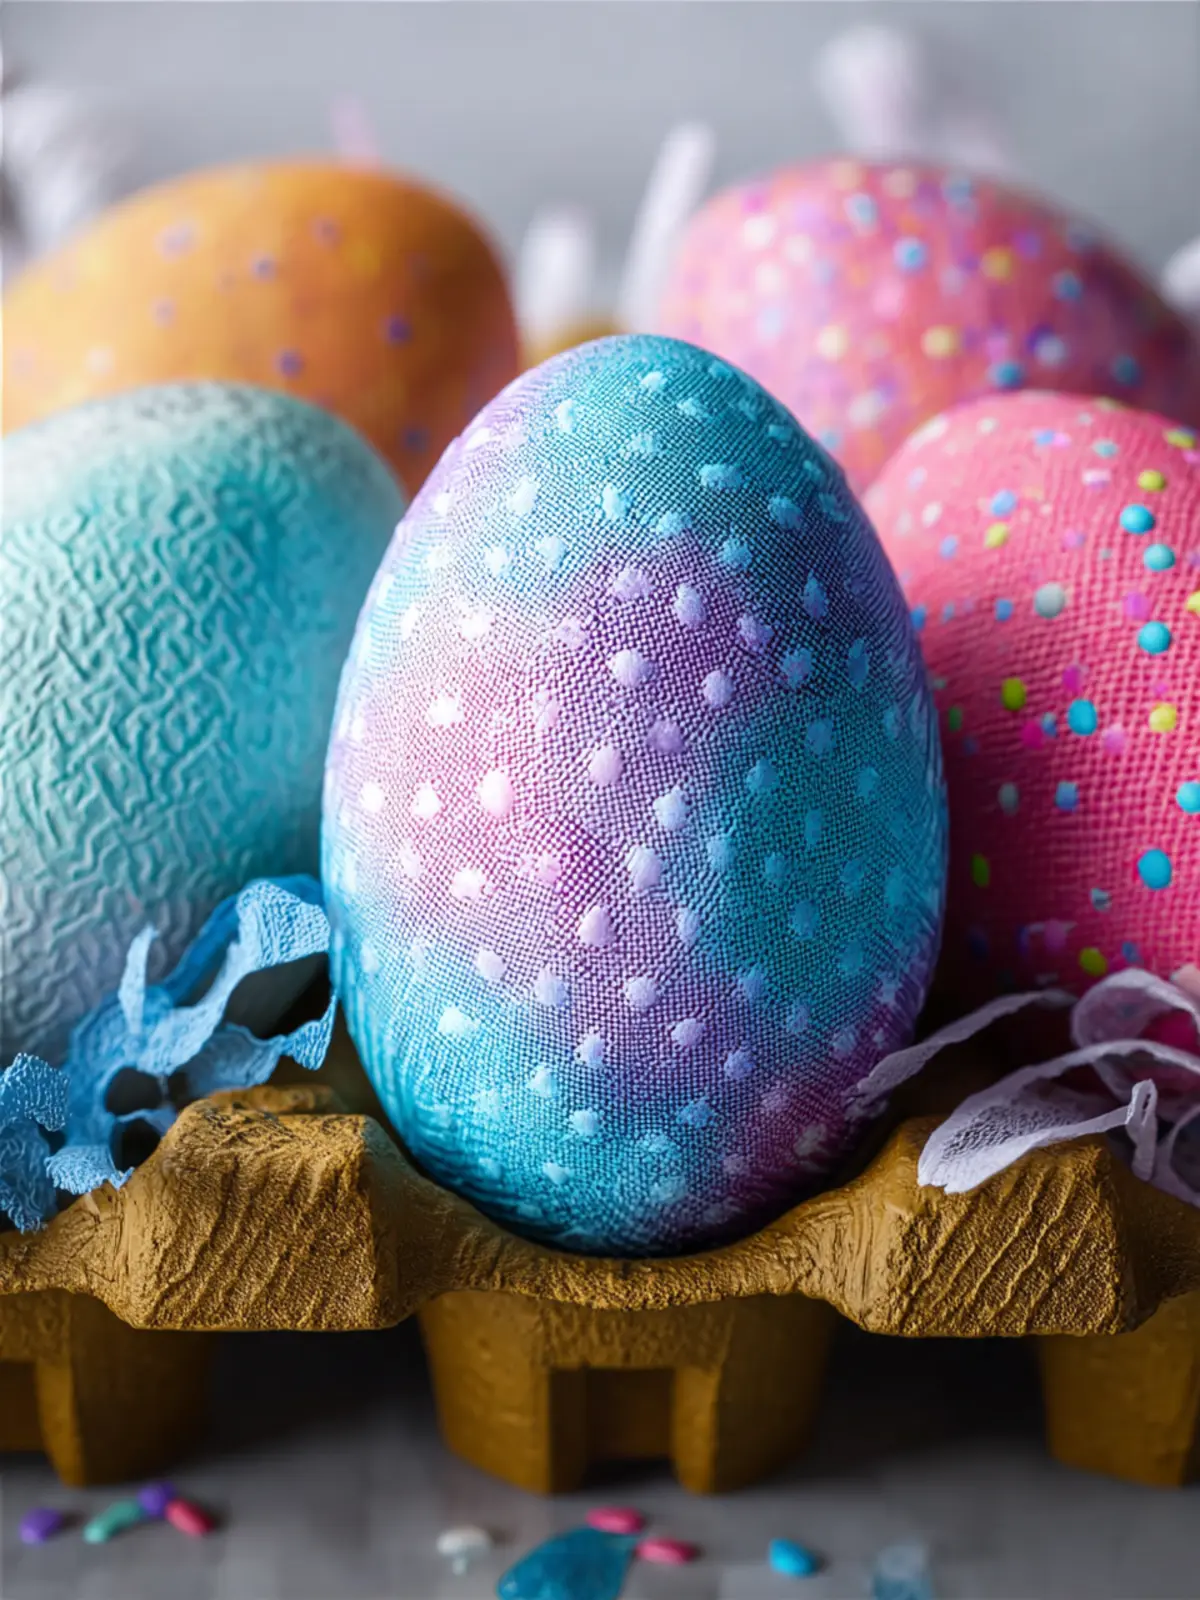
Introduction to Fabric-Textured Easter Eggs
Transforming regular eggs into stunningly unique fabric-textured Easter eggs can turn an ordinary holiday into a memorable experience. The idea sprouted during a rainy afternoon when I found myself sorting through old fabric scraps. I thought, “Why not combine creativity with tradition?” The result is a delightful craft that not only adds charm to your Easter décor but also sparks joy as you reminisce over every piece of fabric lovingly chosen.
What makes fabric-textured Easter eggs so special?
There’s something mesmerizing about the texture and pattern of fabric that really brings your Easter eggs to life. Unlike traditional dyeing, which can sometimes leave eggs looking flat or monotonous, using fabric creates a three-dimensional effect that draws the eye and adds warmth.
-
Unique Designs: Each fabric-textured Easter egg tells a story. The contrasting patterns of the fabrics—whether floral, polka dot, or solid hues—serve as a creative canvas, allowing you to express your personal style or even family traditions.
-
Interactive and Fun: Crafting these eggs can be a fantastic way to spend time with friends, family, or even your kids. Each person can choose their favorite fabric pieces, making it a collaborative effort. Talk about a bonding experience!
-
Eco-Friendly Crafts: If you have leftover fabric from past projects, this is a fantastic way to upcycle and reduce waste. You’re not just making seasonal decor; you’re also contributing to sustainability and creativity in your home.
-
Durability: Unlike traditional eggs, which can crack or spoil, fabric-textured Easter eggs can last for years, making them a cherished part of your holiday decorations. Store them carefully, and they just might become family heirlooms passed down for generations.
As we dive into the recipe for making these fabric-textured Easter eggs, remember that the process is as enjoyable as the final product. So grab your supplies and get ready to create something special this Easter!
Key Ingredients for Fabric-Textured Easter Eggs
Crafting fabric-textured Easter eggs brings an exciting twist to traditional egg decorating. The soft, tactile feel of the fabric makes these eggs a delightful project to do with family or friends. To achieve this charming effect, here’s a closer look at the essential ingredients you’ll need:
-
Plastic Eggs: These form the base for your fabric-textured Easter eggs. They’re lightweight and easy to work with, making them perfect for hiding treats or displaying around your home.
-
Fabric Scraps: Look for colorful cotton or felt pieces. The fabric you choose will dictate the visual appeal of each egg. Floral patterns or gingham prints can lend a cheerful vibe to your decor.
-
Mod Podge: This all-in-one glue, sealer, and finish acts as the adhesive for your fabric pieces. It dries clear, giving a polished look to your eggs once they’re completed.
-
Scissors: A reliable pair of scissors is vital for trimming your fabric scraps into the desired shapes and sizes for wrapping around your eggs.
-
Sponge Brush: Use this to evenly apply the Mod Podge, allowing it to adhere smoothly to the fabric and egg surface.
With these ingredients, the process becomes not just artistic but also wonderfully interactive, perfect for celebrating the season!
Why You’ll Love This Recipe
Creating fabric-textured Easter eggs is not just a delightful craft; it’s an opportunity to weave together creativity and tradition, making your Easter celebrations all the more special. Picture this: you’re gathered with friends and family, laughing and chatting as vibrant colors and textures come to life in your hands. It’s a scene that instantly brings back memories of childhood, which is exactly what this project aims to do.
These fabric-textured Easter eggs not only look stunning but can also serve as beautiful decorations for your home. Each egg tells a story, crafted with care from materials you choose, turning a simple idea into a gallery of personal expression. Plus, this recipe is perfect for individuals and groups alike, making it a fantastic option for a weekend workshop, family gathering, or even a solo creative escape.
What’s even better? These eggs are gentle on the planet. By using fabric scraps and eco-friendly materials, you’ll contribute to a more sustainable approach to seasonal decorations. Whether you’re a seasoned crafter or a first-timer, you’ll find joy and satisfaction in bringing these unique designs to life. So grab your materials and let’s get crafting!

Variations on Fabric-Textured Easter Eggs
Creating fabric-textured Easter eggs opens up a world of creativity that you can explore beyond just the basics. Here are some delightful variations to not only customize your eggs but also to share joyful moments with family and friends.
Vintage Floral Charm
One lovely twist is using vintage floral fabrics. Think of those charming patterns from your grandmother’s sewing box. They can transform your eggs into beautiful décor with a nostalgic feel. Simply cut the fabric into small pieces, layering different patterns for a more eclectic look.
Neon Pop
For those seeking a bold statement, vibrant neon fabrics are a fantastic choice. The bright colors will catch the eye and brighten any Easter display. Pair them with some bold, fun embellishments like glitter or sequins to add an extra layer of excitement.
Nature’s Touch
Embrace nature by using fabric that features botanical prints or earthy colors. This not only gives your fabric-textured Easter eggs a fresh, organic vibe but also invites the beauty of the outdoors into your home. A few sprigs of lavender or rosemary can complement these colors fantastically.
Textured Layers
Experiment with different textures, such as burlap or lace, to create a visually appealing contrast on your eggs. Layering these fabrics will not only add dimension but also interest, allowing each egg to tell a unique story of its own.
The freedom to explore various fabrics and techniques allows for endless creativity in decorating your Easter eggs!
Cooking Tips and Notes for Fabric-Textured Easter Eggs
Creating delightful fabric-textured Easter eggs is a creative project that combines art with tradition. Before diving into the design, consider some helpful tips that can make your crafting experience smoother and more enjoyable.
Choose the Right Fabric
Selecting the right kinds of fabric is crucial for achieving that charming, textured finish. Consider using cotton or burlap, as they hold their shape and create lovely patterns. Old t-shirts or scraps from previous sewing projects can also work well, allowing you to get creative on a budget.
Prep Your Eggs
Start with hard-boiled eggs or wooden eggs for longevity. If using real eggs, ensure they’re thoroughly cooled before decorating. This prevents the fabric from sliding off due to moisture or warmth.
Apply the Adhesive Sparingly
When applying your fabric, be cautious with the glue. A thin even layer is best to prevent lumps and achieve a smooth surface. If the glue dries too quickly, you might struggle to adjust your fabric as needed.
Experiment with Patterns
Have fun with different fabrics and colors! Mixing and matching can create stunning visual effects. Don’t hesitate to experiment—sometimes, what seems like a mistake can turn into a unique design feature.
Seal for Durability
Once your fabric-textured Easter eggs are complete, consider a sealant to protect your hard work. A light coat of Mod Podge can enhance color vibrancy and durability, ensuring your creations last past Easter and into display season.
By following these tips, you can make your egg-decorating experience both enjoyable and successful. Embrace your creativity and have a fabulous time crafting!

Serving Suggestions for Fabric-Textured Easter Eggs
Creating fabric-textured Easter eggs is not just about the crafting process, but also about how you present and enjoy them. Consider these engaging serving suggestions that elevate your holiday gathering.
Display Options
-
Easter Basket Centerpiece: Arrange your beautiful fabric-textured Easter eggs in a decorative basket. Use moss or shredded paper as a base to enhance the visual appeal and add a pop of color.
-
Egg Stands: Invest in or make colorful egg stands to elevate each egg. This will not only add height but will also showcase your artistic creations wonderfully.
Interactive Fun
-
Easter Egg Hunt: Hide your fabric-textured eggs around your home or yard for a delightful Easter egg hunt. This brings a joyful sense of nostalgia and makes for great family fun!
-
Craft Station: Set up a crafting station where friends and family can create their own fabric-textured eggs alongside yours. This encourages creativity and creates a shared experience.
Ultimately, sharing the joy of fabric-textured Easter eggs lies in how they become part of your holiday celebrations. Make your food, fun, and decorative elements come together to create a memorable day!
Time Breakdown for Fabric-Textured Easter Eggs
Creating fabric-textured Easter eggs can be a delightful and relaxing experience, perfect for those looking to add a unique twist to their Easter celebrations. Here’s how the time breaks down for this crafty endeavor.
Preparation Time
You’ll want to allocate about 30 minutes for preparation. This includes gathering your supplies like eggs, fabric scraps, and dye—an opportunity to get creative with colors and patterns!
Dyeing Time
Dyeing the eggs will take approximately 1 hour. This time allows for the eggs to soak up the vibrant dye while you patiently await the colorful transformation.
Total Time
In total, expect to spend around 1.5 hours on this project. It’s a fun way to spend an afternoon, and you’ll end up with beautiful, custom Easter eggs that are sure to impress!
Nutritional Facts for Fabric-Textured Easter Eggs
When diving into the delightful world of fabric-textured Easter eggs, you might wonder about their nutritional contributions, especially when creating these whimsical decorations for your celebrations.
Calories
Each fabric-textured Easter egg is crafted from non-edible materials, ensuring that they are calorie-free, making for a fun and guilt-free festive decoration.
Protein
While not intended for consumption, these eggs showcase your crafting skills rather than providing protein. Perfect for imaginative decor, they won’t add any protein to your diet.
Sugar
Since these decorations are made from fabric, there’s no sugar content to consider. Enjoy the creative process without worrying about those sweeteners sneaking into your festivities!
Creating your own fabric-textured Easter eggs offers an opportunity to bond with friends and family while adding a vibrant touch to your holiday decor.
FAQs about Fabric-Textured Easter Eggs
Creating fabric-textured Easter eggs is a delightful way to blend traditional Easter festivities with a unique crafting experience. As you dive into this colorful project, you might have some questions regarding techniques, materials, and storage. Let’s explore some frequently asked questions to help you on your crafting journey.
How do I ensure the colors stay vibrant?
To keep the hues of your fabric-textured Easter eggs bright, consider using high-quality fabric dye or paint specifically designed for egg decorating. After dyeing, seal the colors with a clear acrylic spray or mod podge, which also adds a nice glossy finish. Avoid exposing your eggs to direct sunlight for prolonged periods, as it can fade colors over time.
Can I use natural dyes instead?
Absolutely! Natural dyes can make the process even more fun and eco-friendly. You can use ingredients like beet juice for red, turmeric for yellow, or spinach for green. Just keep in mind that natural dyes may not yield as vibrant results as synthetic dyes. To enhance color richness, let your eggs soak longer in the dye—a little patience goes a long way.
What’s the best way to store my decorated eggs?
When it comes to storing your fabric-textured Easter eggs, place them in a cool, dry area away from direct sunlight. Using an egg carton or a padded box can provide extra cushioning and protection. If you’ve used real eggs, ensure they’re refrigerated if they haven’t been fully dried or lacquered to avoid spoilage.
By keeping these tips in mind, you’re set to create beautiful and lasting fabric-textured Easter eggs that will impress everyone this Easter!
Conclusion on Fabric-Textured Easter Eggs
Creating fabric-textured Easter eggs is not just an art project; it’s a delightful way to engage with loved ones and ignite your creativity. Once you’ve gone through the charming process of decorating these eggs, you’ll have a unique centerpiece for your Easter celebration. The textures and patterns you choose can reflect your personality or even tell a story about your family traditions. Plus, they make for fantastic gifts or keepsakes that can be enjoyed year after year. So gather your materials, let your imagination soar, and bring a touch of whimsy to your holiday festivities with these beautiful, textured eggs!
Print
Egg Dyeing Instructions
- Total Time: 5 minutes
- Yield: 1 egg 1x
- Diet: Vegetarian
Description
Step-by-step instructions for dyeing hard-boiled eggs.
Ingredients
Scale
- 1 hard-boiled egg
- Food coloring (according to instructions)
- 1 piece of fabric
- 1 rubber band
- 1 paper towel
Instructions
- Prepare the Dye. Mix your egg dye according to the instructions. I used food coloring, which can be very strong, so a little goes a long way.
- Wrap the Egg. Tightly wrap a piece of fabric around your egg. Secure it at the top with a rubber band. Make sure the fabric is pressed snugly against the shell – it helps create a clearer design.
- Dye the Egg. Dip the wrapped egg fully into the dye. Leave it for about 30 seconds – or even less if the dye is strong. The longer it sits, the deeper the color and the more it may blur the design.
- Dry the Egg. Remove the egg and gently pat it dry with a paper towel. Let it sit for about 2 minutes.
- Unwrap. Carefully cut away the fabric wrap.
- Final Dry. Pat dry again and let the egg rest for 3 more minutes.
- Repeat and Enjoy! Keep going with as many eggs as you like.
Notes
- Ensure the fabric is tightly wrapped for the best design.
- Adjust dye time based on desired color intensity.
- Prep Time: 5 minutes
- Cook Time: 0 minutes
- Category: Dessert
- Method: Dyeing
- Cuisine: American
Nutrition
- Serving Size: 1 egg
- Calories: 68
- Sugar: 0 g
- Sodium: 62 mg
- Fat: 5 g
- Saturated Fat: 1.6 g
- Unsaturated Fat: 3 g
- Trans Fat: 0 g
- Carbohydrates: 0.6 g
- Fiber: 0 g
- Protein: 6 g
- Cholesterol: 186 mg