Follow Me On Social Media!
Cool Whip Dyed Easter Eggs: A Fun and Easy Twist!
Introduction to Cool Whip Dyed Easter Eggs
Creating colorful Cool Whip Dyed Easter Eggs adds a delightful twist to a beloved holiday tradition. Many of us can recall sitting around the kitchen table with family, excitedly decorating eggs in vivid hues during the Easter season. This year, let’s add a fun and modern spin to that nostalgia by using Cool Whip to achieve vibrant colors with minimal mess.
A Nostalgic Twist on a Classic Tradition
You might wonder how a fluffy topping typically found on desserts can transform our Easter egg decorating experience. Allow me to take you on a journey back to my childhood, when my siblings and I would clamor for the brightest colors and the most creative designs. Fast forward to today, and I’m still just as enthusiastic about egg decorating, but now I appreciate recipes that blend creativity and simplicity.
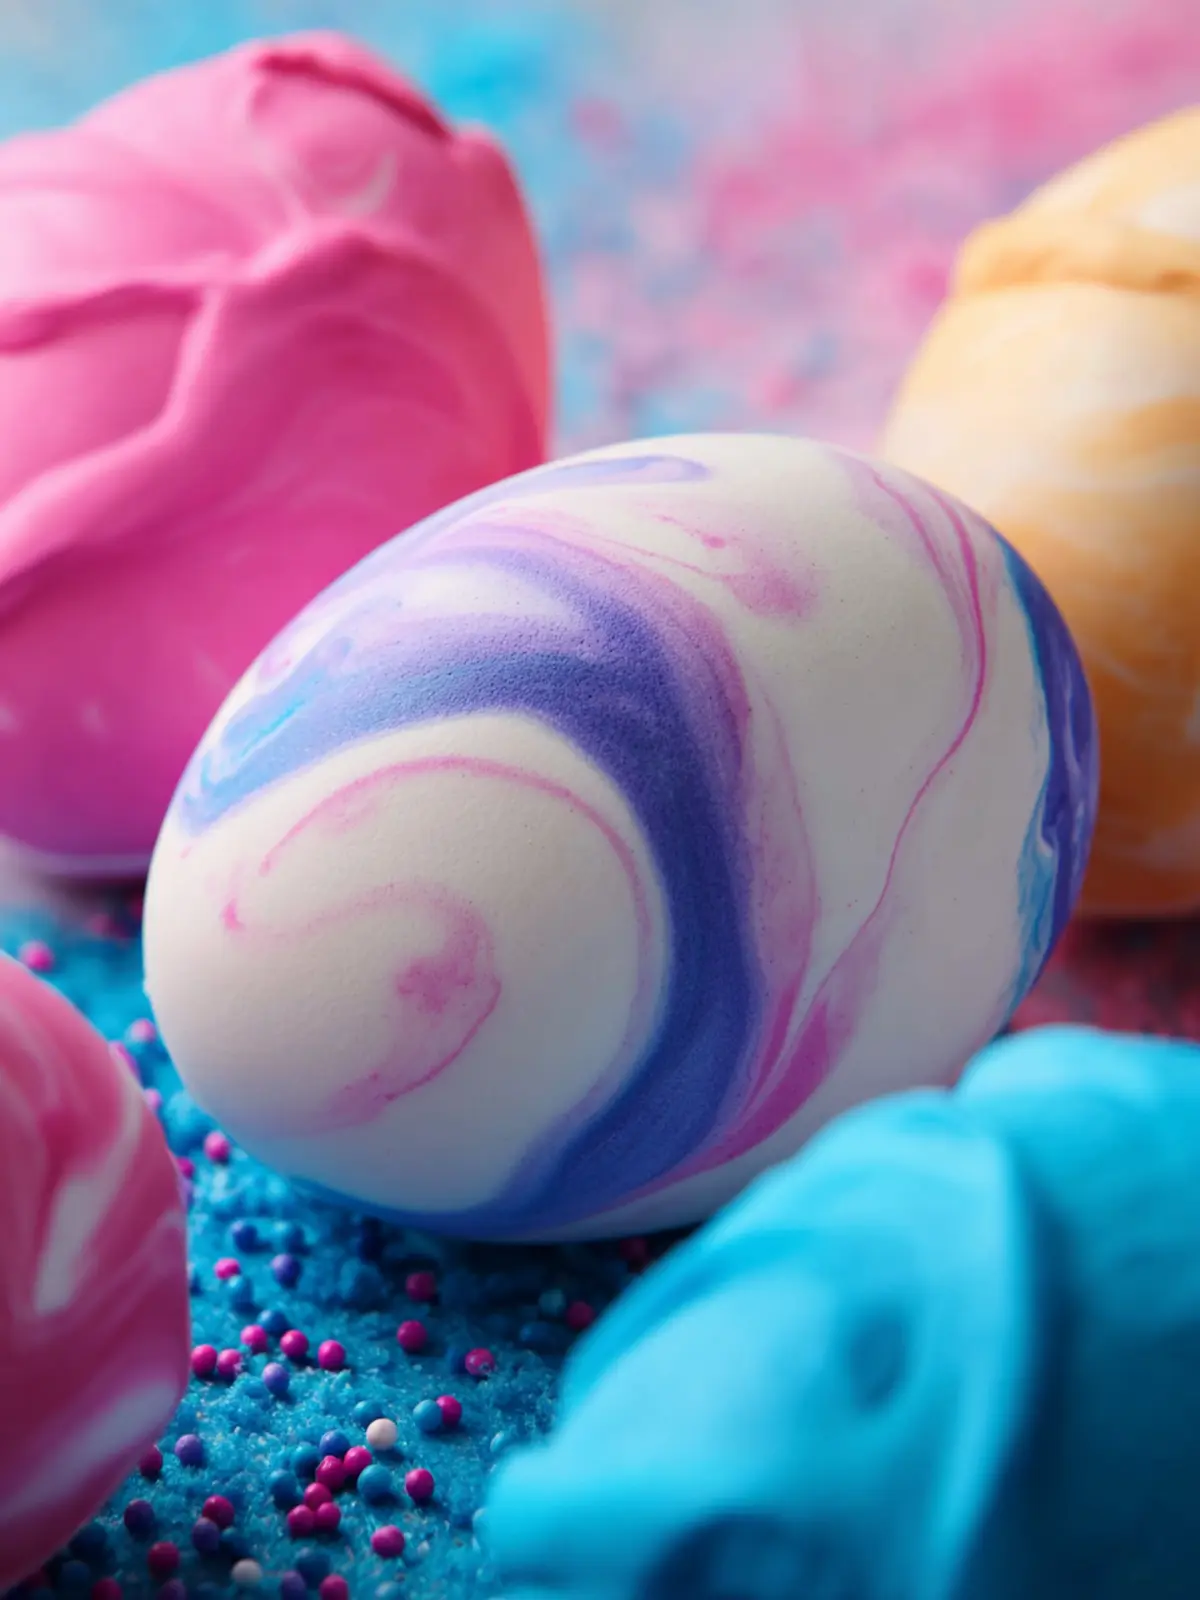
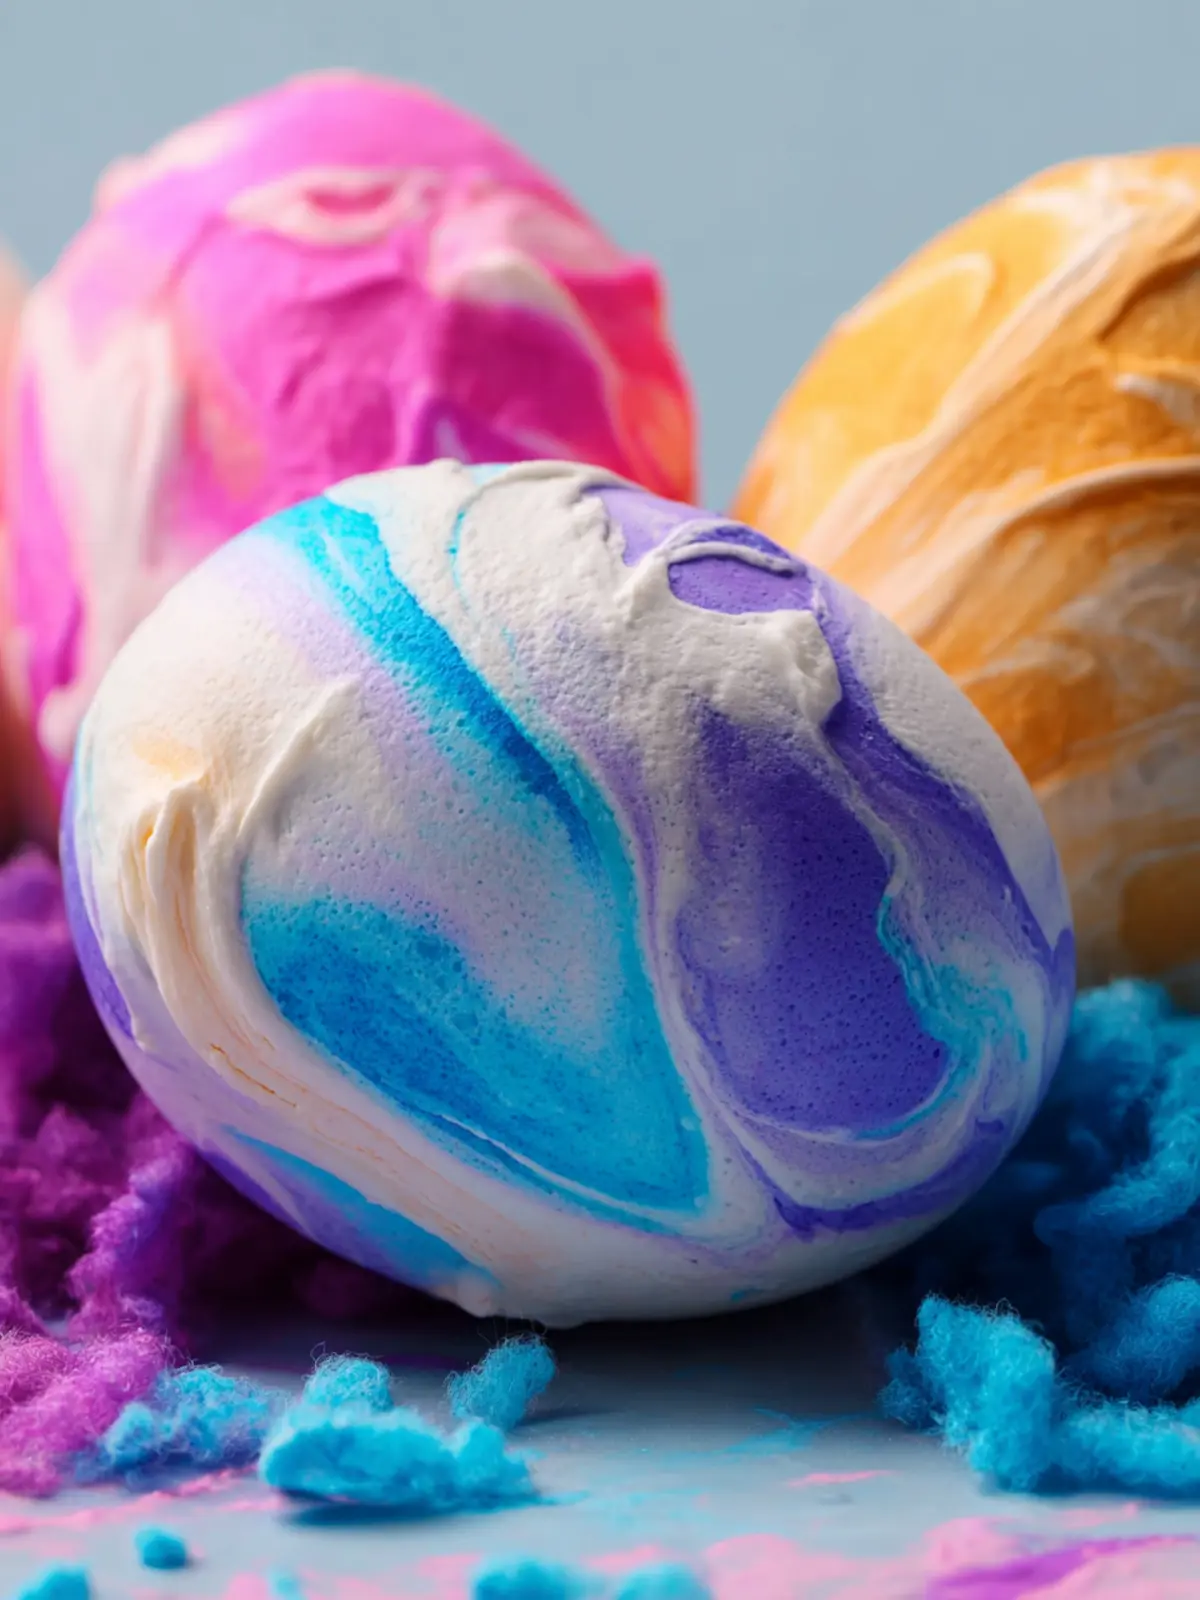
Using Cool Whip is not only an innovative way to dye eggs; it also creates a playful, hands-on experience that brings joy and laughter to the process. Instead of the usual dyeing kits that often lead to stains and spills, Cool Whip Dyed Easter Eggs streamline everything into one easy step. When mixed with food coloring, the Cool Whip allows for beautiful, marbled patterns. Plus, it’s an engaging activity for friends or family and can spark creativity in everyone involved.
To make these eggs, you’ll need a few simple ingredients:
- Hard-boiled eggs: The star of the show! You can either make them from scratch, or purchase ready-to-go boiled eggs from the store. Either way, ensure they’re completely cool before you start decorating.
- Cool Whip: This is the magic ingredient that allows for that creamy consistency and bright colors. It’s fun to work with and easy to clean up.
- Food coloring: Choose vibrant hues that suit your style. A few drops can lead to beautiful shades and patterns.
By using Cool Whip, we not only honor the tradition of egg decorating but also elevate it with a dash of fun, modern convenience. So, gather your ingredients and get ready to create some beautiful, colorful Easter eggs that are sure to spark joy and nostalgia!

Key Ingredients for Cool Whip Dyed Easter Eggs
Creating Cool Whip Dyed Easter Eggs is not just an activity; it’s a vibrant way to make lasting memories with family and friends. The result? Beautifully decorated eggs that are as fun to create as they are to admire. Let’s dive into the key ingredients that make this recipe both easy and fun.
-
Cool Whip: The star of the show! Opting for this fluffy, whipped topping allows the dye to spread effortlessly over the eggs. Plus, it adds a unique texture that is entirely different from traditional methods.
-
Food Coloring: Your choice of food coloring is essential. Use gel colors for more vibrant hues, allowing your Cool Whip Dyed Easter Eggs to really pop.
-
Hard-Boiled Eggs: Fresh, quality eggs are crucial for achieving a good shell and perfect coloring. Make sure they are well-cooked and cooled before starting the dyeing process.
-
Vinegar: A splash of vinegar mixed into the dye helps it adhere better to the eggs, creating a glossy finish.
-
Plastic Gloves: Keep your hands clean and free of dye-stains by wearing gloves while handling the eggs.
With these key ingredients in hand, you’re well on your way to creating stunning Cool Whip Dyed Easter Eggs that will dazzle everyone!
Why You’ll Love This Recipe
Experience the joy of Cool Whip Dyed Easter Eggs, where creativity meets tradition. There’s something irresistibly charming about turning ordinary eggs into vibrant masterpieces that brighten any holiday celebration. This recipe is not just a fun activity; it becomes a cherished memory you create with friends and family, making it perfect for both kids and adults alike.
Here’s what makes this recipe a must-try:
-
Easy and Mess-Free: Using Cool Whip minimizes mess compared to traditional dyeing methods. It’s an easy cleanup after all the fun, allowing you to focus on what matters—enjoying time with loved ones.
-
Vibrant Colors: The whipped topping acts as a canvas for beautiful colors, and you can experiment with various shades. Imagine each egg table bursting with hues like bright teal, sunny yellow, and deep purple—all of which bring a smile.
-
Tasty Results: Once decorated, these eggs aren’t just eye candy; you can enjoy the delicious insides as a light snack afterward. Plus, with a little imagination, they can become part of delightful deviled eggs or salads!
This holiday season, let Cool Whip Dyed Easter Eggs inspire your creativity and bring warmth to your celebrations, crafting not just eggs, but memories to treasure for a lifetime.
Variations
Embracing creativity with Cool Whip Dyed Easter Eggs can elevate your egg-decorating game. There are plenty of delightful twists you can put on this classic activity.
Mix It Up with Flavors
- Flavor Bombs: Instead of just dyeing the Cool Whip, consider adding a few drops of food-safe flavor extracts to each color. A hint of vanilla, almond, or even mint can create a unique experience when everyone goes for a bite.
Beyond the Standard Colors
- Color Combinations: Combine different hues in your dyeing process. Swirl colors together in the Cool Whip for beautifully marbled effects on your eggs. Think about pairing colors like turquoise with gold or classic yellow with vibrant pinks.
Texture Play
- Sprinkles or Edible Glitter: Add a layer of fun by covering your dyed eggs in sprinkles or edible glitter after they dry. This adds an exciting and extra festive touch to your Cool Whip Dyed Easter Eggs, perfect for a holiday centerpiece.
Experimenting with these variations can make your Easter tradition even more special and tailored to your tastes!
Cooking Tips and Notes
Creating Cool Whip Dyed Easter Eggs involves a sprinkling of creativity along with technique. It’s not just about making them colorful; it’s about making memories!
Choosing Your Eggs
While you can use any eggs, fresh, organic eggs not only taste better but also have a firmer shell, which is perfect for the dyeing process. For a more vibrant outcome, consider using white eggs, as they tend to reflect dye colors more vividly than brown eggs.
Preparing the Cool Whip Mixture
When mixing the Cool Whip, ensure it’s soft enough to spread without tearing the eggshell. Let it sit at room temperature for about 10–15 minutes. This will make the dyeing process smoother and your colors more even.
Color Mixing Tips
Feel free to mix food colors to create unique shades. Want a pastel yellow? Combine a drop of yellow with a tiny bit of blue. Always test your color blend on a paper towel before applying it to your eggs.
Timing is Key
Let the eggs rest in the colored Cool Whip for the recommended time. If you’re aiming for deep hues, a longer sit will help intensify the color. Remember, patience is part of the fun!
Cleaning Up
After the dyeing fun, clean your workspace immediately to prevent staining. A simple vinegar solution works wonders for stubborn dye spots on surfaces.
Embrace the process! Making Cool Whip Dyed Easter Eggs should be an enjoyable, colorful adventure for everyone involved.

Serving Suggestions
When it comes to enjoying your Cool Whip Dyed Easter Eggs, presentation can elevate the experience. While these colorful creations are delightful on their own, there are several fun and creative ways to serve them that can add a touch of festivity to any gathering.
Colorful Centerpiece
Arrange your dyed eggs in a decorative bowl or a vibrant basket. Layer some grass or straw at the bottom to create a charming nest-like feel. This not only highlights their vivid colors but also serves as an eye-catching centerpiece for your Easter brunch or springtime celebration.
Fun Snack Pairings
Consider serving your eggs alongside complementary snacks. Fresh fruit, like strawberries or pineapple, pairs beautifully with the sweetness of the Cool Whip, shining a light on both flavors. You can also include crackers or a light cheese platter for a delightful contrast.
Kid-Friendly Activities
Turn serving into a creative activity! Have a decorating station with edible markers or sprinkles for kids to personalize their Cool Whip Dyed Easter Eggs. This transforms snack time into a fun, interactive experience that everyone will remember.
These serving ideas ensure that your Cool Whip Dyed Easter Eggs not only taste great but also look enchanting!
Time Breakdown for Cool Whip Dyed Easter Eggs
Creating Cool Whip Dyed Easter Eggs is a delightful culinary adventure that’s not only colorful but also surprisingly simple. To help you plan your egg-dyeing session efficiently, here’s a quick breakdown of the time involved.
Preparation Time
Getting ready for this fun activity takes about 15 minutes. Gather your eggs, food coloring, Cool Whip, and any other supplies you need, and set up your workspace.
Dyeing Time
The fun part of dyeing the eggs will take approximately 30 minutes. After you’ve coated the eggs in Cool Whip and added the food coloring, allow them to sit for about 15 minutes for the colors to set before rinsing.
Total Time
In total, you’ll spend around 45 minutes creating these vibrant Cool Whip Dyed Easter Eggs. This includes both preparation and dyeing time, making it a quick and enjoyable way to celebrate the season!
Nutritional Facts for Cool Whip Dyed Easter Eggs
While celebrating with Cool Whip Dyed Easter Eggs, it’s essential to keep nutritional values in mind. Those vibrant creations are not just a feast for the eyes—they can also be part of a balanced treat!
Calories per egg
Each egg is about 70 calories. This is a fun way to bring color to your Easter festivities without breaking the calorie bank.
Total servings
This recipe yields approximately 12 eggs, making it perfect for family gatherings or sharing with friends. With only 70 calories per egg, you can enjoy these beauties guilt-free!
Life is about enjoying experiences, and what better way to celebrate spring than with colorful, delightful eggs that are light on calories yet big on fun?
FAQs about Cool Whip Dyed Easter Eggs
When diving into the delightful world of Cool Whip Dyed Easter Eggs, it’s natural to have questions. This whimsical approach to decorating eggs not only adds vibrant colors but also brings a fun twist to your Easter celebrations. Let’s address some common inquiries and provide clarity for a joyous crafting experience.
Can I use other types of whipped topping?
Absolutely! While Cool Whip is a popular choice due to its smooth texture and easy spreadability, you can experiment with other brands of whipped topping. Just ensure it has a similar consistency to achieve the best color transfer on your eggs. Some folks even try using homemade whipped cream for a dairy-free, fresh option.
How long do dyed eggs last in the refrigerator?
Once you’ve decorated your Cool Whip Dyed Easter Eggs, they can last in the refrigerator for about one week. To maximize freshness, store them in a covered container. Just remember that the eggs’ longevity also depends on their initial freshness, so be sure to start with eggs that were recently purchased!
What if I don’t have vinegar?
Not to worry! While vinegar helps with color adherence, you can substitute it with a splash of lemon juice or a store-bought egg dye kit that contains its own fixing agents. Both alternatives can yield beautiful results without compromising the dyeing process.
Exploring these FAQs will make your adventure in dyeing eggs more enjoyable and stress-free. Happy crafting!
Conclusion on Cool Whip Dyed Easter Eggs
In the delightful world of Cool Whip dyed Easter eggs, you’ve not just painted eggs but created cherished memories with family and friends. This vibrant alternative to traditional dyeing methods adds a playful twist to your Easter festivities. As you gather your loved ones, you’ll find that each egg not only showcases unique colors but also sparks laughter and creativity in the process.
Embrace the joy of crafting these whimsical creations, and don’t hesitate to experiment with colors and designs. This method invites everyone to express their artistic flair! So, let the artistry of Cool Whip dyed Easter eggs bring color and joy to your spring celebrations.
Print
Decorative Dyed Hard-Boiled Eggs
- Total Time: 25 minutes
- Yield: 24 eggs 1x
Description
Brighten up your Easter celebrations with these colorful, decorated hard-boiled eggs!
Ingredients
Scale
- 24 tub hard-boiled eggs
- 1 Cool Whip
- assorted colors of gel or liquid food dyes
- 1 white distilled vinegar
Instructions
- Prep the Eggs – Soak boiled eggs in vinegar for 15 minutes, then rinse and dry.
- Prepare the Dye – Spread Cool Whip evenly in a 9×13 dish. Add drops of food dye in different areas and swirl with a toothpick.
- Dye the Eggs – Wearing gloves, roll eggs in the dyed Cool Whip until fully coated. Let them sit for at least 10 minutes.
- Rinse & Dry – Gently rinse eggs (without rubbing) and place on paper towels to dry completely.
Notes
- For best results, use gel food dye for more vibrant colors.
- Ensure eggs are dry before storing or displaying.
- Prep Time: 15 minutes
- Category: Dessert
- Method: No-cook
- Cuisine: American
Nutrition
- Serving Size: 1 egg